Reviving a beautiful relic

Sometimes, it’s nice to spend time on Ebay looking at vintage computer equipment. I couldn’t ever justify actually buying anything in that category, because spending money on increasing the amount of old junk I have in my office is rarely a good idea. So instead, I have found that drinking before Ebaying makes buying useless crap, purely because you like the look of it, much, much, easier.

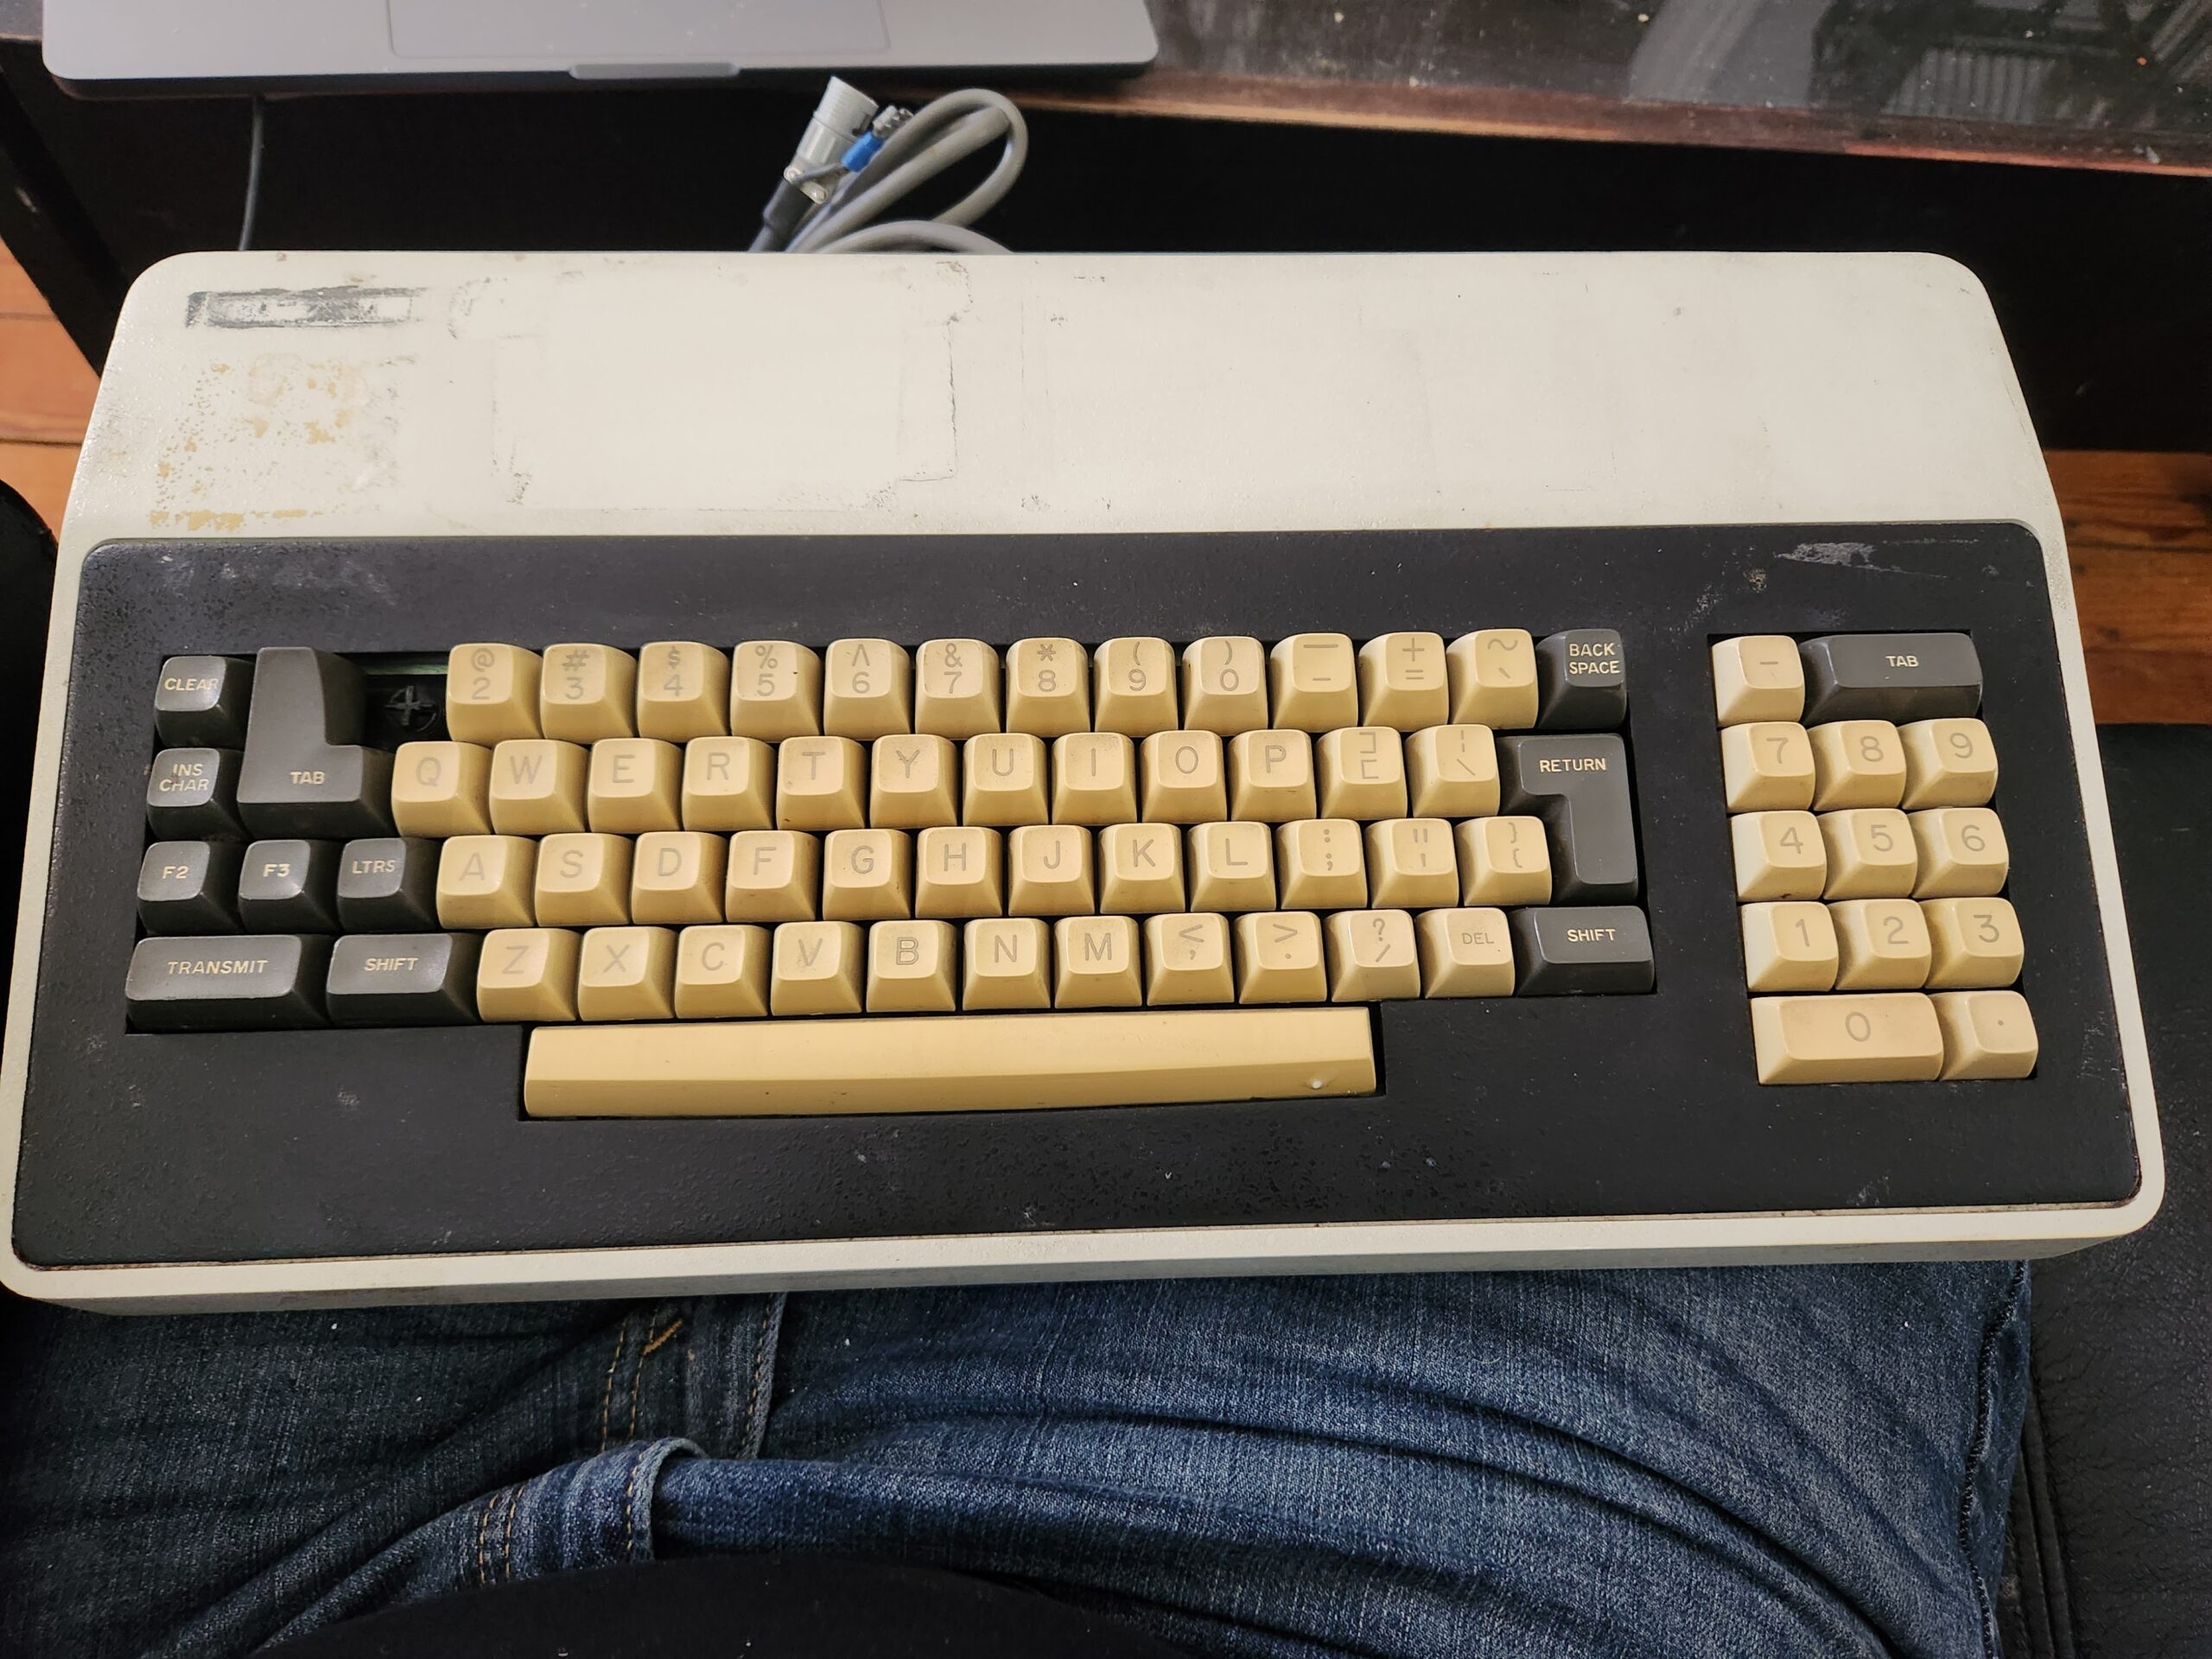
The keyboard pictured above called out to me, and if you can’t understand why then I wouldn’t be at all surprised; just understand that to me, it looked fascinating and beautiful. Yes, I know there is a missing key, but to me that flaw makes it even more adorable. There was very little information regarding the system it came from, beyond the word “Qantel”, which I assumed was a misspelling of “Quantel“. It wasn’t. But I made it mine regardless.

A bit of searching revealed it to be the keyboard from an interesting looking terminal called the VT3, and, of course, someone had been kind enough to make the manual available online. Younger readers may be astonished to know that in the golden age of computers, even basic equipment tended to come with a manual, or set of manuals, that not only described how to use the equipment, but how to service it, and even how it worked! Imagine!

Obviously, as well as appreciating it as an objet d’art, I wanted to see if I could get it to actually work as a functional keyboard; keyboards of this vintage are built to last, and out-klack even the klackiest cherry-loaded custom mechanical gaming keyboard. The only problem is that it predates any keyboard standard that you’re likely to have in a modern OS; not just pre-USB but pre-PS/2 and pre-AT. Fortunately, the manual proved extremely informative.

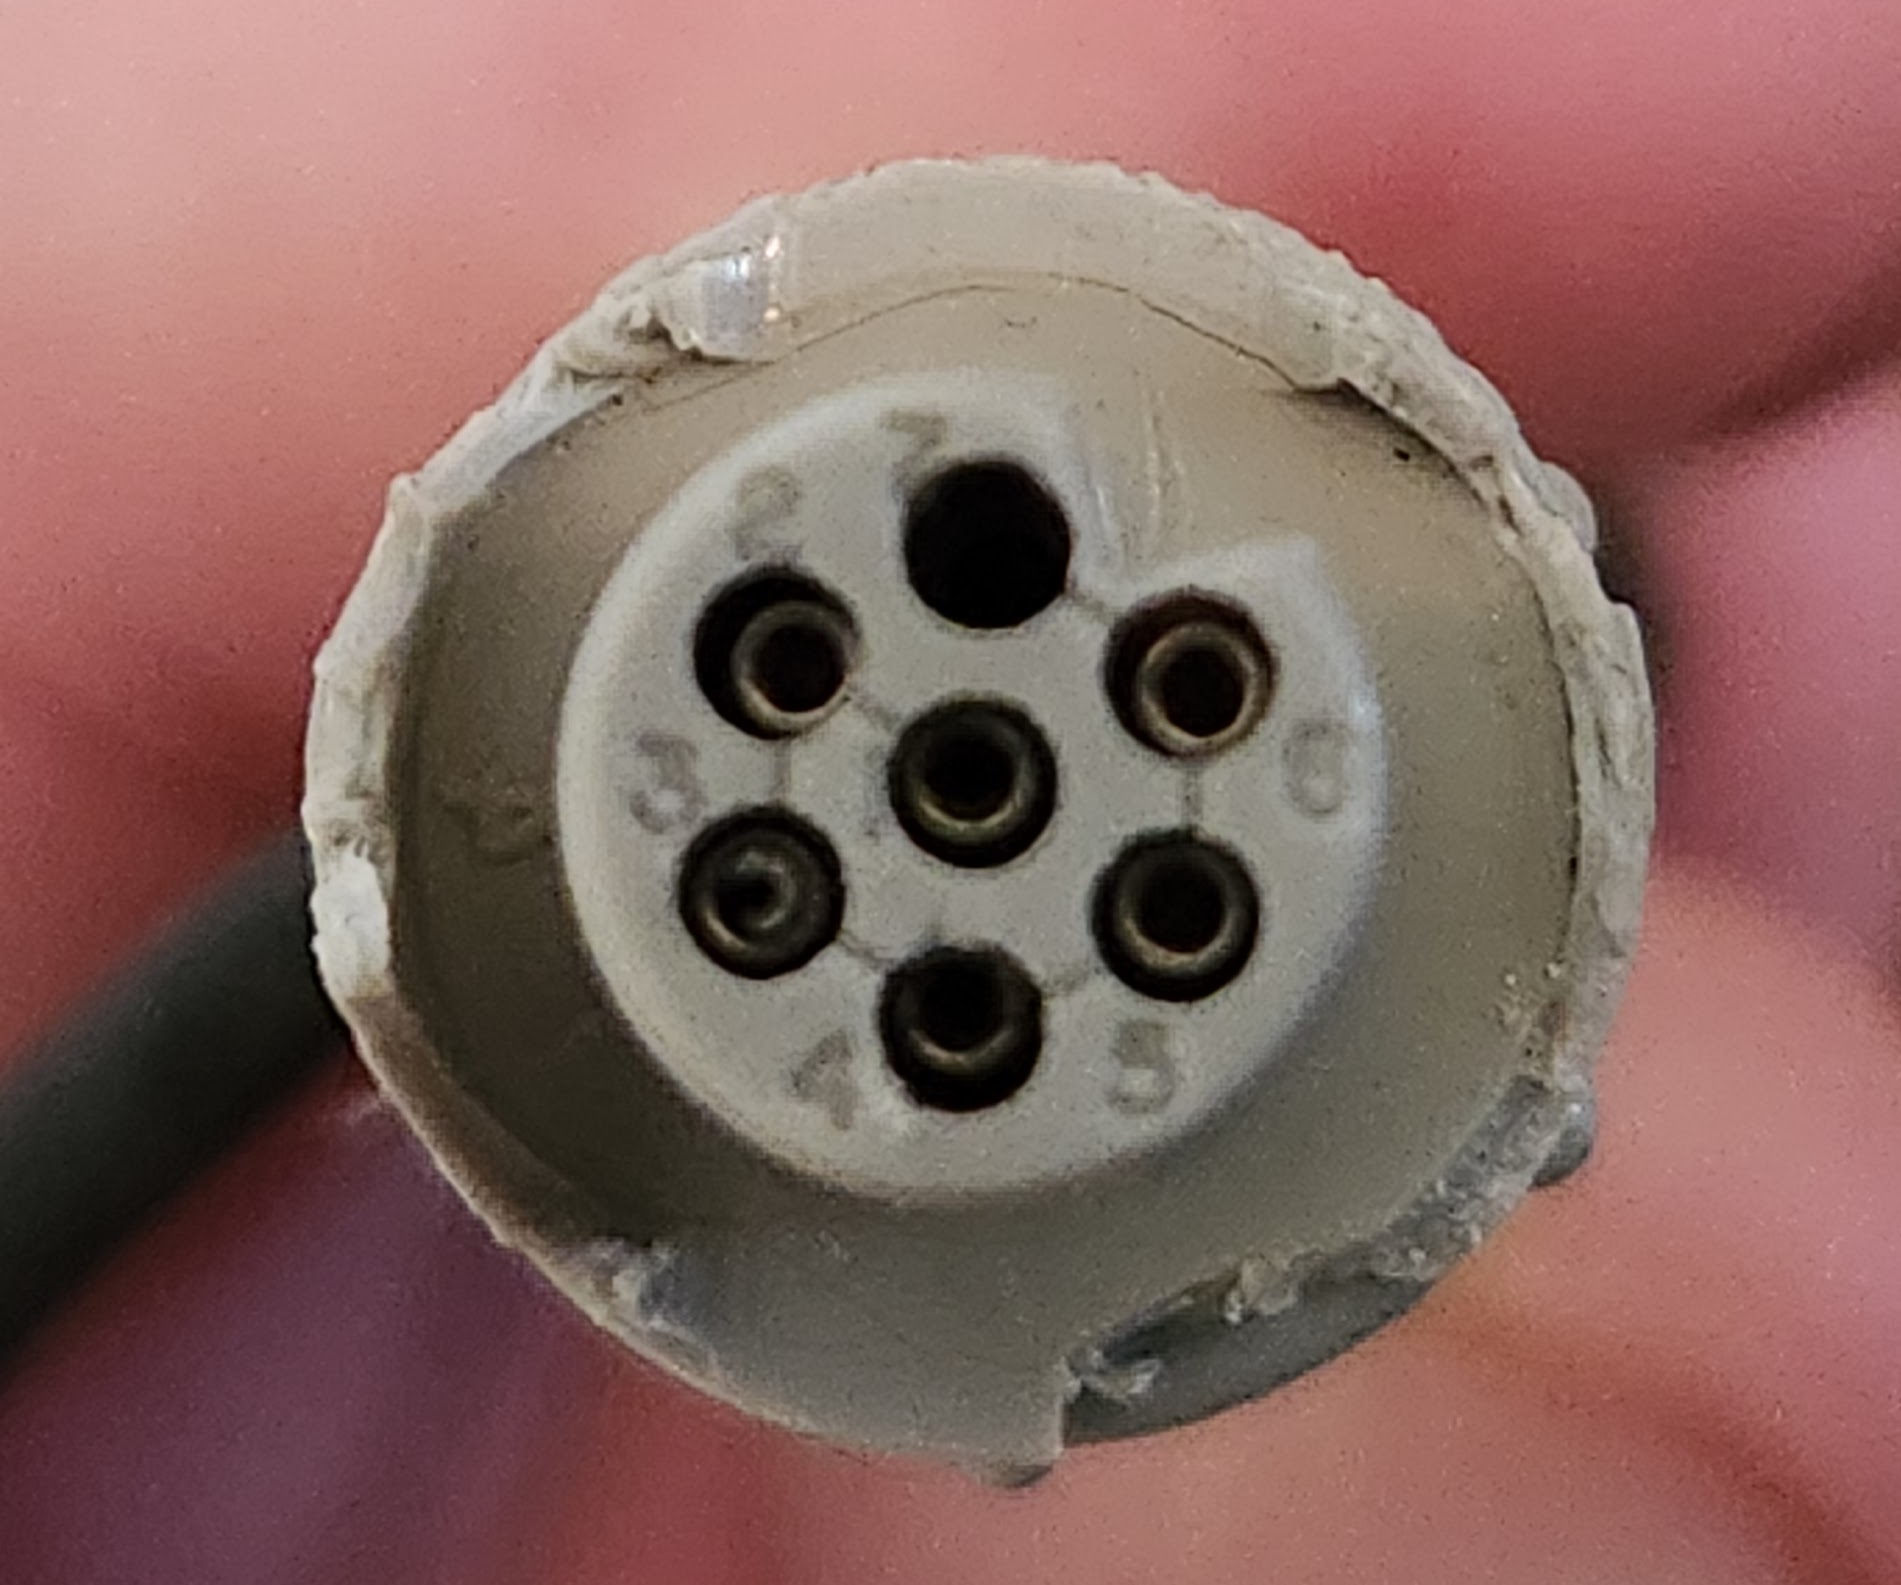
The keyboard had a single cable coming out of it with a 7 pin Viking connector, the plastic sheath of which was starting to break. The simplest solution would have been to remove the connector and connect to the wires directly, but a part of me didn’t like the idea of losing that little piece of history – and who knows, maybe one day I’ll happen across the rest of a VT3 and get it working. That won’t happen.

The manual contained all of the schematics for every part of the VT3, including a numbered pin-out. The manufacturers of the connector were kind enough to etch the pin numbers on the face of the socket. As you can see from the picture, the numbering is peculiar, with pin 1 in the center and the rest of the numbers spiraling around it; also, pin 7 is not used. The connections were described as follows:

1 - DKEY+
2 - GND
3 - CLOCK+
4 - STROBE+
5 - +5V
6 - ALARM-

The description of these signals was a bit vague, but from what I could determine, the keyboard uses a type of synchronous serial interface. When a key is pressed, the STROBE+ line becomes active, then it is the job of the connected interface to produce a clock on the CLOCK+ line, and with each clock cycle the keyboard presents the next bit of the scan code on the DKEY+ line. ALARM- can be invoked to make the keyboard bleep.

For testing this out, I decided to use an Adafruit FT232H breakout board: the Swiss Army Knife of signal hackery. Apart from the fact that I had one to hand, it could also provide the 5V power that was needed for the keyboard, and is easily controlled with simple code. Wiring it up would also be trivial because the tolerance for 5V signals means it can be directly connected to the socket with DuPont wires.

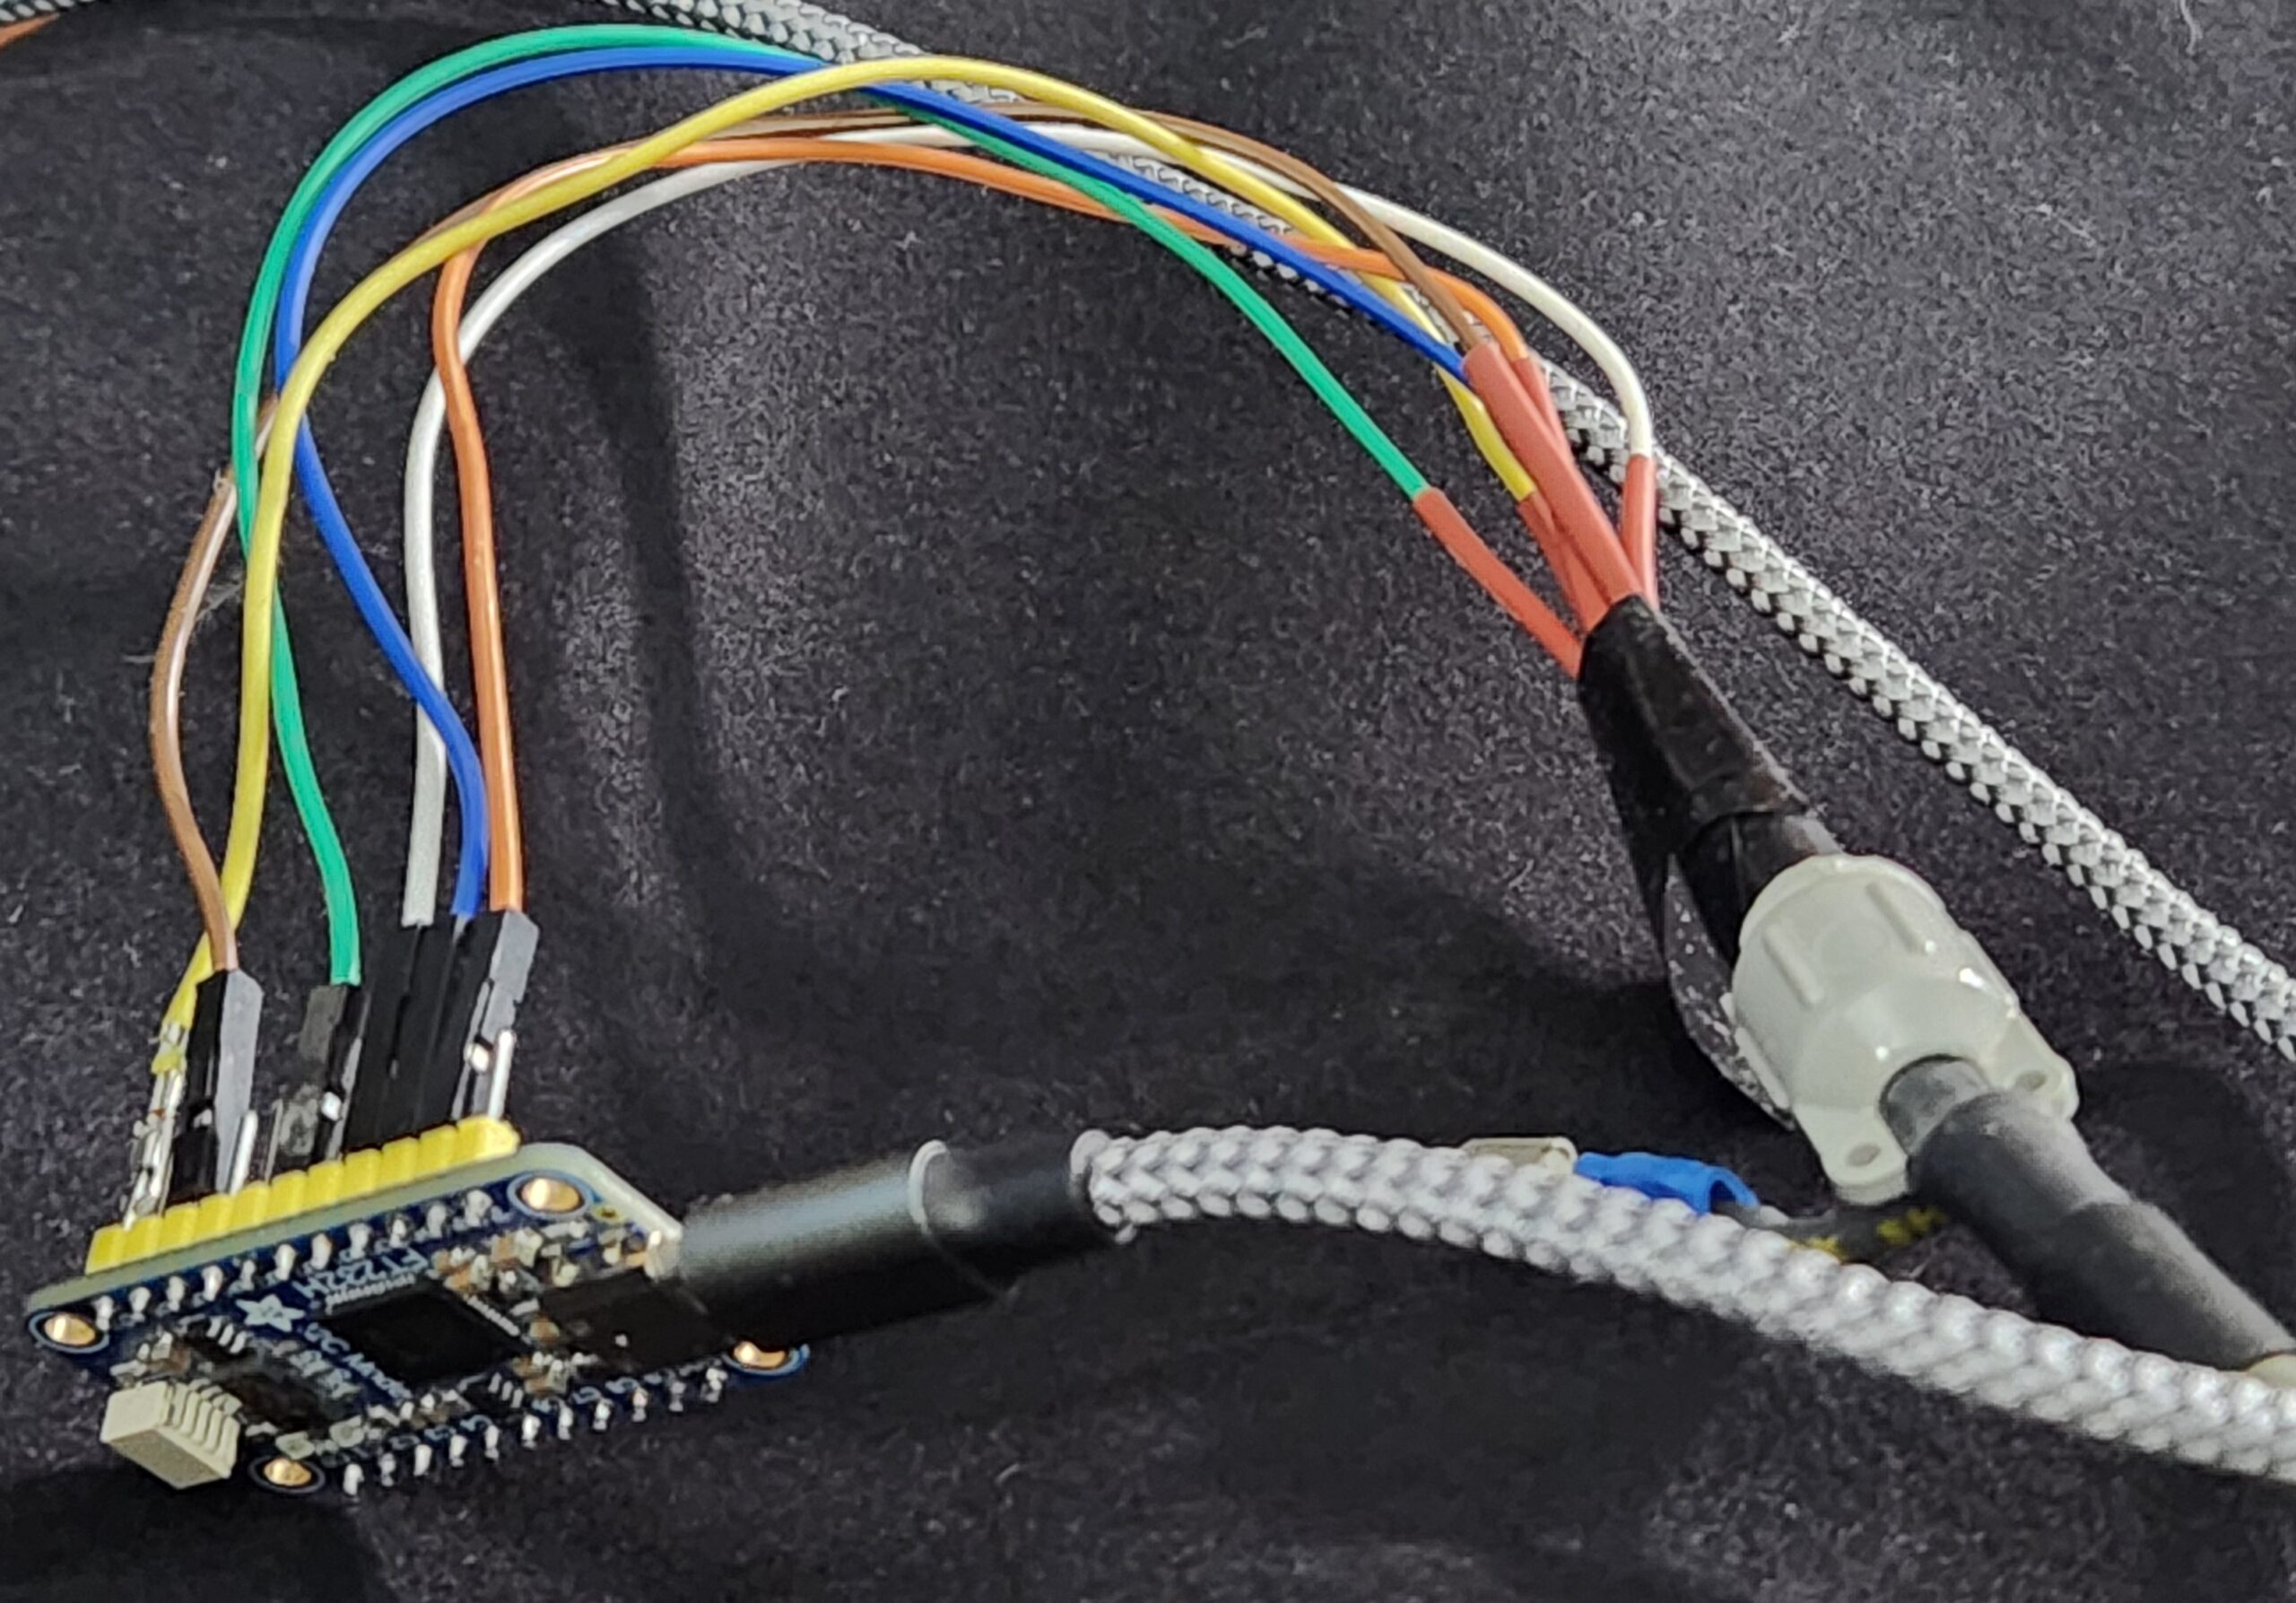
To attach each DuPont wire to the keyboard connector, I removed the black plug from one end and replaced it with a slim heat-shrink tube so that they were thin enough to coexist happily when their pointy ends were plugged into the Viking connector. A bunch of electrical tape was then wrapped around the wires to keep them in place. As you can tell, I’m a real craftsman.

The other ends of the DuPont wires I randomly placed on the GPIO pins of the FT232H. For those that are playing along at home, the wiring turned out to be as follows:

1 - DKEY+   - White    D0 in
2 - GND     - Blue     GND
3 - CLOCK+  - Yellow   D7 out
4 - STROBE+ - Green    D2 in
5 - +5V     - Orange   5V
6 - ALARM-  - Brown    D5 out

The FT232H is a tremendously useful chip, but it’s proprietary, and the official libraries are closed source. This is not something I can deal with normally, but thankfully someone has written an open source, reverse-engineered, library for talking to it.

It’s important to note that the computer I’m trying to get this keyboard talking to is running Linux. No apologies for that. All of the code described below is available from github; there’s a link at the end.

Initially, I wrote a stupidly crude program to make sure that the keyboard was actually working as the manual suggested. It simply monitored the STROBE line watching for a state change, at which point it toggled the CLOCK line, effectively creating a clock train. Meanwhile the DKEY line was monitored for the key code. Here is a logic trace of the keys “a”, “s”, and “d” being pressed.

logic trace of A,S,D
The keys “a”, “s”, and “d”
Logic trace of the S key
Detail of the “s” key.

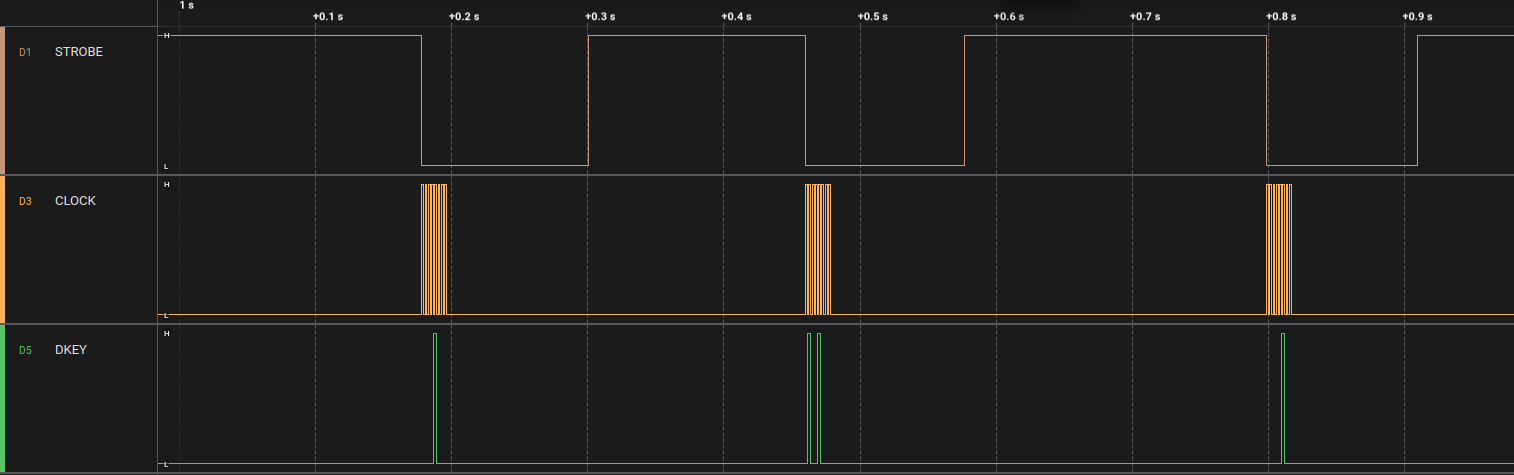
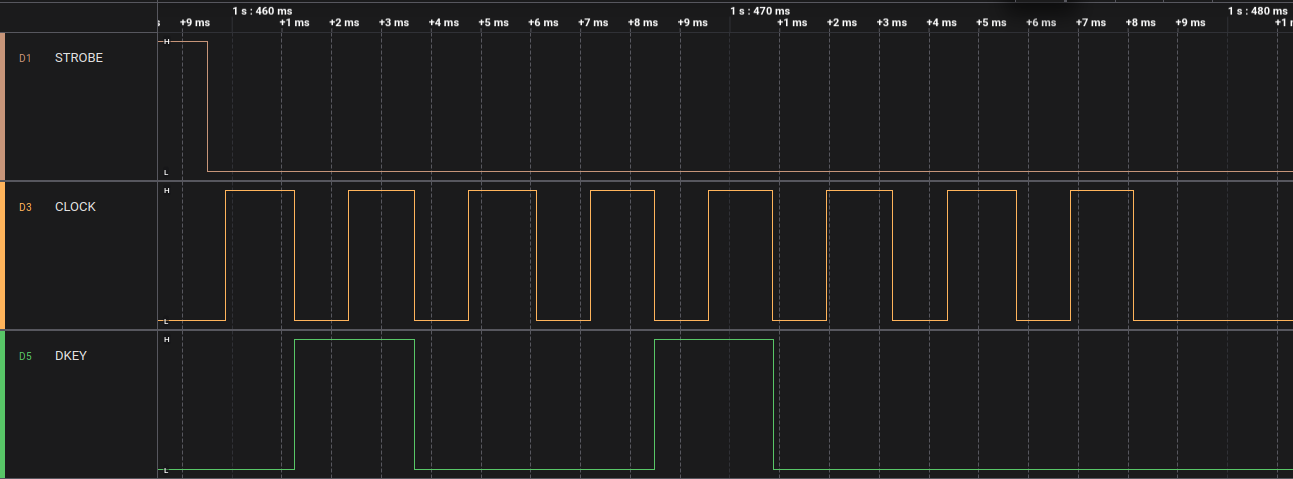
Every time the CLOCK line goes high, the state of the DKEY line is read. If it’s high, then the bit is set (1), low and it’s unset (0). From the trace above you can see that the bits of the code are 01001000. The order the bits arrive is LSB to MSB, but obviously when we write binary we start with the MSB on the left, to LSB on the right. In other words, we need to reverse the bits to get the key code: 00010010, or 18 in decimal.

The shift key doesn’t produce a separate key code, instead it causes bit 7 of the key code to be set when other keys are typed. For example, compare the trace for “s” above with SHIFT+”s”:

Logic trace of Shift and S.
Logic trace of Shift and “s”.

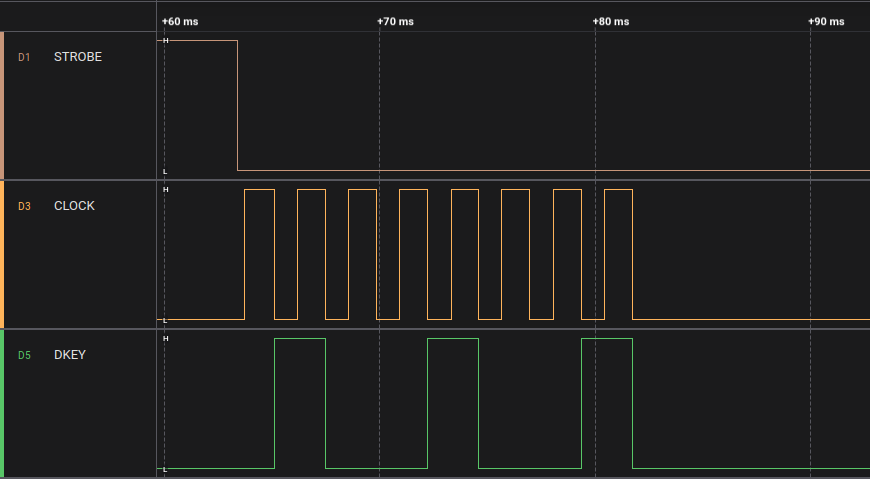
You can see that this time the code is the same as before but with the 8th bit also set, yielding a code of 10010010 – decimal 145 (i.e. 18 + 127).

You may notice that 18 is not the ASCII code for the letter “s”, in fact it’s not related to “s” in any standard coding. The key codes are completely arbitrary and derived from how the key-switches are connected together. Consequently, there needs to be a mapping from the keycodes to the actual keys they represent. So, I decided to manually map them by hitting every key and recording the scan codes for each. There was probably a map in the manual somewhere, but as I was mapping them to Linux Key codes anyway there would have been a lot of manual work regardless. It turned out that this process really didn’t take very long, and I ended up a single file containing all the mapping: keymap.c.

Here is the first few lines as an example. In a nutshell we have an array containing all 127 possible keycodes, indexed by scancode. You’ll see that the 19th entry (i.e. index 18) is “KEY_S”. Those “KEY_” codes come from the Linux header file input-event-codes.h by the way. It wasn’t essential to use them, but it comes in handy further down.

#include "input-event-codes.h"
#include "keymap.h"


#define KEY_MAP_DEF(x) {x,#x}

mapping_t keymap[127] = {
                KEY_MAP_DEF(0),
                KEY_MAP_DEF(KEY_NUMERIC_7),
                KEY_MAP_DEF(KEY_NUMERIC_4),
                KEY_MAP_DEF(KEY_INSERT),
                KEY_MAP_DEF(0),
                KEY_MAP_DEF(KEY_CLEAR),
                KEY_MAP_DEF(0),
                KEY_MAP_DEF(/*KEY_TRANSMIT*/ 0),
                KEY_MAP_DEF(KEY_APOSTROPHE),
                KEY_MAP_DEF(KEY_SPACE),
                KEY_MAP_DEF(KEY_LEFTBRACE),
                KEY_MAP_DEF(KEY_ENTER),
                KEY_MAP_DEF(KEY_BACKSLASH),
                KEY_MAP_DEF(KEY_GRAVE),
                KEY_MAP_DEF(KEY_BACKSPACE),
                KEY_MAP_DEF(KEY_NUMERIC_1),
                KEY_MAP_DEF(KEY_A),
                KEY_MAP_DEF(KEY_C),
                KEY_MAP_DEF(KEY_S),

So, with this keymap it was now possible to make sure everything was working as expected. I made my little program print out the correct key code every time a key was pressed and, shockingly, it all seemed to work first time.

At this point, it would normally be time to switch out the FT232H for something that could mimic a USB keyboard interface, but then it occurred to me that we may not need to yet. Linux provides user-mode interfaces to the entire input event system, meaning that, in theory, we could make this keyboard available to the system by running a simple userland program. I’d never messed around with the input subsystem before, but it seemed like it could be a fun little learning experience.

The API for the input system (uinput) looked surprisingly simple, but Internet wisdom suggested that the best way to interact with it was via the libevdev library, which is designed to help end users avoid gotchas and bugs, rather than talking to /dev/uinput directly.

Using the library is surprisingly straightforward.

dev = libevdev_new();
libevdev_set_name(dev, "Qantel Keyboard");
libevdev_enable_event_type(dev, EV_KEY);
libevdev_enable_event_type(dev, EV_SYN);

You create a libevdev device by calling libevdev_new(), and then enabling the events that you want it to receive. For a keyboard, all we really need is EV_KEY, which is sent on any key event (e.g key up, or key down), and EV_SYN, which tells the input system that we’re ready for it to process the previous EV_KEY events we’ve already sent.

Next is a slightly odd thing, we have to enable every possible event code that we’re going to send. So we loop through the keymap and enable each:

    for (int k = 0; k < 256; k++) {
        if (keymap[k].keycode) {
            int ret = libevdev_enable_event_code(dev, EV_KEY, keymap[k].keycode, NULL);
            if (ret != 0) {
                fprintf(stderr, "Error registering event type: %s\n", keymap[k].name);
                return 2;
            }
        }
    }

Next, we create a uinput device from our libevdevice

libevdev_uinput_create_from_device(dev, LIBEVDEV_UINPUT_OPEN_MANAGED, uidev);

This simplifies everything and manages the interactions with the uinput device for us.

Once this is in place, we can run the existing code to clock in the keystrokes, and for each one send corresponding events.

                libevdev_uinput_write_event(uidev, EV_KEY, key, 1);
                libevdev_uinput_write_event(uidev, EV_SYN, SYN_REPORT, 0);
                usleep(1000);
                libevdev_uinput_write_event(uidev, EV_KEY, key, 0);
                libevdev_uinput_write_event(uidev, EV_SYN, SYN_REPORT, 0);

This corresponds to sending a key down event, waiting 1ms and then sending a key up event.

This was enough to get it it acting as a functional system keyboard for my laptop. Here’s a little demonstration video:

The little bit of code is available on github for the curious. It should be noted that this is just a quick hack for testing the keyboard, and isn’t designed to be a keyboard driver. Unfortunately the FT232H doesn’t provide a good way to trigger interrupts so we’re polling it – and that is far from ideal.
Also, at present we’re not dealing with modifier keys (e.g. shift/ctrl). If anyone’s interested we can develop this further.

Share

Idle Sunday Weirdness

Sunday. I found myself watching an old VHS rip of TISWAS, and immediately after it there was an episode of The Innes Book Of Records, containing this surreal Scottish take on the Bonzo’s Humanoid Boogie.
scotsman with a bolt through his neck

The whole episode is some of the most bizarre TV I’ve ever seen, and out-weirds my few memories of the show. It seems so unlikely that there was ever a time the BBC would put astounding stuff like this on at 9pm. It also contains appearances from Viv Stanshall BTW.

Share

NetBSD on a JavaStation

Hard as it may be to imagine, there was a time when Java was brand new and exciting. Long before it became the vast clunky back-end leviathan it is today, it was going to be the ubiquitous graphical platform that would be used on everything from cell phones to supercomputers: write once, run anywhere.

Initially I drank the kool-aid and was thrilled about this new โ€œmodernโ€ language that was going to take over the world, and drooled at the notion of Java-based computers, containing Java chips that could run java byte-code as their native machine code.

I even had a promotional flyer stuck to my wall, alongside pictures of Lydia Lunch, drum machines, and Jimi Hendrix; it had a picture of the soon to be released JavaStation, looking like a designer purple coffee pot; it stimulated my imagination just by looking at it. 

Of course, as it transpired, things didn’t quite go to plan: the JavaStation didn’t materialise for ages, and when it did, it didn’t look like a coffee pot, it looked like a mini SPARCstation with the java logo plastered on it. The Java-chip thing proved more difficult to realize than anticipated and so the machine was a based on SPARC, without a disk, intended to be used to run Java apps in a Java based OS called, cleverly, JavaOS. Despite not being a pure Java machine, it was, arguably, the first real network computer, and I wanted one.

Eventually the JavaStation 2 was released, and it did look more like a coffee pot, but was still โ€œjustโ€ a SPARC. They didn’t change the world.

Decades later, here we are, and I am finding myself wallowing in nostalgia for the unreachable technology of my youth.

After many months of searching I found a Mr Coffee JavaStation for sale in Canada; unfortunately the seller only accepted payments through a Canadian banking service which is pretty much inaccessible outside Canada. Many months later, a friend of mine moved to Canada for work and was kind enough to buy it and ship it to me. 

Waiting for that package to arrive was painful; I was checking the tracking details obsessively and experienced a great deal of frustration and bafflement as it moved around the country in completely bizarre directions. It went from Canada, pretty much right past my house to a mail depot that was further away from me than the original location in Canada! 

But eventually it arrived and, apart from a few ink stains and a scratch, was in nice condition. BTW, any advice on cleaning it up without damaging the casing would be very gratefully received.

I hooked it up to a monitor and keyboard and then powered it on. To my joy, the fan and the power LED came to life! But nothing on the screen. The keyboard LEDs didn’t light up eitherโ€ฆ

So, I hooked up the serial port to a Mac. This involved digging out an old DB-9 serial cable from my time machine, and an RS-232 to USB adapter. On the mac I fired up Minicom: nothing.

Even at the point of power on, nothing came out of the serial port. This was a great disappointment, but I knew it may need some love when I ordered it, and so I spent time looking around inside for anything obviously blown, and then had a crack at it with the service manual and a multi-meter. Thankfully, there are several great archives of Sun documentation on the Internet – which is handy because it really does seem like Oracle went out of their way to scrub all traces of Sunโ€™s existence from history.

Sadly, the service manual had no information about repairing the motherboard beyond declaring it a “whole unit replacement”.

There are a lot of very old forums involving people discussing various problems with JavaStations, but they were all concerned with working units.

After some lackluster investigations, I began to fear that something was seriously wrong with it, that would involve a whole new level of investigation with a scope and logic analysers. I’m also not anywhere experienced enough at that type of thing to have confidence that I’d ever get it fixed, so it became another monument to failed attempts at reviving beautiful old tech.

Every time I thought I’d have another go at it, the memories of failed attempts at recapping other devices came to mind, and I couldn’t bear the idea of spending so many hours on trying to fix and replace components, only to have it still not work at the end.

Many months later I got inspired again, and thought I’d see if there were any videos of people working on JavaStations. I found a video of a guy doing a tear-down of a Mr Coffee and, despite being quite adept at getting into the thing, I gave it a watch. 

The guy was clearly knowledgeable about the topic and pointed out that the battery backed up NVRAM was very likely to have a dead battery. This was something I was familiar with, having revived some old IPC/IPX boxes in the past. But then he said something magical: if the battery is dead, it won’t boot at all, and you’d need to configure it with a serial terminal. Well, Iโ€™d looked for life with a serial terminal and there was nothing. But when I watched him do the same thing, I noticed something different: it took a considerable amount of time before anything appeared on the serial port. Like a minute. Also, I hadn’t bothered to check the required baud rate (it’s been a while since I had to worry about that stuff). So, what if I had the wrong baud rate and also hadn’t waited long enough to see any transmissions. You probably know what I’m going to say next, and yes, the only thing wrong with my JavaStation turned out to be a dead NVRAM battery and my lack of patience. With a 9600 baud serial connection and some patience I was delighted to be greeted with some complaints about corrupt NVRAM followed by an “ok” prompt.

There is no way to convey to you how excited I was to see this. Even if I couldn’t get this thing to boot an OS, I had a lovely serial-based FORTH interpreter to play with. In case you’re confused by that last sentence, you need to know that Sunโ€™s bootloader environment from that period was called OpenBoot, and consisted of a FORTH interpreter, from which you can interrogate the device tree and pretty much do whatever you want. At this point the JavaStation was a functional computer and that would have been sufficient on its own – but getting it to run an actual OS would be a nice fun project.

After a bit of Googling, I plumped for NetBSD; their documentation was extremely comprehensive (as is frequently the case with the BSDs), and it appeared that even in the latest release (10.1), there was still support for not just SPARC, but specifically the JavaStation.

Before any of that, we had to deal with the NVRAM battery being dead. The dead battery meant that whenever the power is turned off, the data in the NVRAM is lost, resulting in junk memory contents. When the machine starts up, it performs a checksum on the a part of the NVRAM data called IDPROM, and if it’s incorrect, resets it to default values. So, until we get the battery replaced [this will be discussed in a later post], we have to give the IDPROM some sensible(ish) values every time we start up. Thankfully this is quite simple, and we can do it all at the “ok” prompt. Here is what that looks like:

ok 01 00 mkp
ok real-machine-type 01 mkp
ok 8 02 mkp
ok 0 03 mkp
ok 20 04 mkp
ok b0 05 mkp
ok 0b 06 mkp
ok 13 07 mkp
ok 0 08 mkp
ok 0 09 mkp
ok 0 0a mkp
ok 0 0b mkp
ok b0 0c mkp
ok 0b 0d mkp
ok 13 0e mkp
ok 0 f 0 do i idprom@ xor loop f mkp

This looks insanely complicated, but it’s actually pretty straightforward. Skip this section if you’re not interested.


As mentioned above, we’re in a FORTH interpreter, but even if you’ve never used (or even heard of) FORTH, it’s simple to understand, but a bit odd when you first have to deal with it.

The command “mkp” takes the two numbers before it, and writes the first one into the IDPROM at the address of the second one. So, for example, the first line below “01 00 mkp” writes the value 1 into address 0. Below is an explanation of what the numbers we’re writing mean:

In case you’re wondering how we know what data to write where, there’s a handy guide at https://shrubbery.net/~heas/sun-feh-2_1/Devices/IDPROM/IDPROM_Overview.html. The MAC address I’m using is made-up, but the first three bytes (08-00-20) are actually the correct Sun OUI for this device.

The “checksum” line is more complicated: it’s a tiny little FORTH program that generates the checksum and writes it to address 0xF. Figuring out how it works can be left as an exercise for the reader.


So, after entering these commands, we have written a configuration to the IDPROM that is valid enough to allow it to boot. Now we have to reboot without removing the power, so we type “reset”.

The JavaStation restarts, and this time it’s happy enough to start using its built in display (via the VGA port):

Yes! So it’s happy with the configuration, but now we have to get it to boot. It doesn’t have its own storage, so it needs to boot over the network.

The net-booting procedure works as follows:

  • The JavaStation attempts to get an IP address by using the venerable RARP protocol.
  • Once it has an IP address, it presumptuously assumes that whatever machine gave it the IP address will also be able to supply a second stage bootloader using tftp, and attempts to fetch it.
  • If it manages to get a secondary bootloader over tftp, it runs it.
  • The secondary bootloader then attempts to fetch and run a kernel and filesystem using NFS.

As well as the original Sun documentation, NetBSD has great documentation for booting diskless machines at https://www.netbsd.org/docs/network/netboot, and within that document there are subsections for specific architectures and machines including the JavaStation.

As should be reasonably obvious, net-booting needs support from other computers on the network. The NetBSD documentation describes how to achieve this using a bunch of different operating systems, but as I have a few Linux boxes to hand, that’s what I used.

Firstly, we need to answer the JavaStation’s RARP request. This is a very old standard and well supported by Linux using software called “rarpd”. On ubuntu, you can install this with a simple:

sudo apt install rarpd

Once installed, you only need to edit one file to configure it: /etc/ethers. Just add a line to the file consisting of the MAC address of the JavaStation, a space, and the IP address you want it to have on your network. In my case:

08:00:20:B0:0B:13 192.168.128.45

The MAC address is defined by whatever you configured into the NVRAM in the steps above.

Next, we need to be able to provide the secondary bootloader over tftp. This is also surprisingly easy. On ubuntu, install tftpd with:

sudo apt install tftpd

NetBSD provides a secondary bootloader specifically for SPARC/JavaStations; the latest NetBSD version (10.1) is at https://cdn.netbsd.org/pub/NetBSD/NetBSD-10.1/sparc/installation/netboot/.
bootjs.net is specifically for the JavaStation, but it’s apparently intended for a newer version of the JavaStation than mine because when I tried it, it failed with an “illegal instruction” error. Instead, I used the boot.net version which worked fine. You need to rename the file with a specific format: the IP address of the JavaStation, but in 8 capitalized hex digits, followed a dot, and then the architecture (in this case “SUN4M”). So, in this example the IP address (as defined in rarpd above) is 192.168.128.45, which in hex is C0A8802D. I downloaded and renamed the bootloader with the command:

curl -o /tftpboot/C0A8802D.SUN4M https://cdn.netbsd.org/pub/NetBSD/NetBSD-10.1/sparc/installation/netboot/boot.net

This should be all you need for getting the secondary bootloader to run. At this point it’s a good idea to give the JavaStation a name so we don’t have to continually use the IP address to refer to it in further configurations. In my case I wanted to give it the name “duke,” and so added the following to the /etc/hosts file:

192.168.128.45 duke

The next stage of the booting involves the JavaStation performing a DHCP request in order find the NFS server it is to boot from. Like most people, I already use DHCP on my LAN to configure everything, but in the DHCP server runs on my router, and the NFS server is running on a different Linux machine. The response from the DHCP server therefore needs to contain a field (“siaddr”) referring to the address of the NFS server. While it should be possible to configure the router’s DHCP server to do this, I had a tough time making it happen. So instead, I decided to configure the router to ignore this MAC address, and instead ran a DHCP server on the Linux machine. You can install the ISC dhcp server on ubuntu with:

sudo apt install isc-dhcp-server

Then add an entry to /etc/dhcp/dhcpd.conf along the following lines:

subnet 192.168.128.0 netmask 255.255.255.0 {
      
        class "javastation-class" {
               lease limit 1;
               default-lease-time 3600;
               max-lease-time 7200;
        }

        pool {
               allow members of "javastation-class";
               range dynamic-bootp 192.168.128.45 192.168.128.45;
        }

        host duke {
          hardware ethernet 08:00:20:B0:0B:13;
          fixed-address 192.168.128.45;
          option routers 192.168.128.1;
          option root-path "/export/client/root";
        }
}

The “host duke” section contains the config we need the JavaStation to have. Apart from the fixed-address, we’re giving it the path to the NFS shares which will be located on the same machine. As we’re specifically supplying a “hardware ethernet” address, this configuration will only be supplied to our JavaStation, and all other clients will be ignored, leaving the Router DHCP server to deal with everything else as normal.

Finally we need to serve the NetBSD filesystem with NFS. Thankfully, despite its age and total lack of security, NFS is still well supported under Linux. In a nutshell, here’s how you set up the filesystem. These directions are taken from NetBSD’s excellent documentation: https://www.netbsd.org/docs/network/netboot/nfs.html#linux

These instructions assume we’ll host the filesystem at /export/client, but it’s really up to you where you put it, as long as you remember to add the path to the DHCP config above.

# mkdir -p /export/client/root/dev
# mkdir /export/client/usr
# mkdir /export/client/home
# cd /export/client/root
# curl -L https://cdn.netbsd.org/pub/NetBSD/NetBSD-10.1/sparc/binary/sets/kern-MRCOFFEE.tgz | tar xvpzf -
# mknod /export/client/root/dev/console c 0 0

I suggest renaming the kernel from “netbsd” to “kona”, which is the default name the Javastation uses:

# mv netbsd kona

Add the following lines to /etc/exports:

/export/client/root duke(rw,no_root_squash)
/export/client/usr duke(rw,root_squash)
/export/client/home duke(rw,root_squash)

Obviously, substitute “duke” for whatever you called your JavaStation.

# cd /export/client/root
# curl -L https://cdn.netbsd.org/pub/NetBSD/NetBSD-10.1/sparc/binary/sets/base.tgz | tar zxvpf -
# curl -L https://cdn.netbsd.org/pub/NetBSD/NetBSD-10.1/sparc/binary/sets/etc.tgz | tar zxvpf -
# mkdir /export/client/root/kern
# dd if=/dev/zero of=/export/client/swap bs=4k count=4k 

Create/edit /export/client/root/etc/ifconfig.<ethernet device name> i.e. ifconfig.le0 in this case, and add the following line (setting the netmask and broadcast for your network):

inet duke netmask 255.255.255.0 broadcast 192.168.1.255

Create/edit /export/client/root/etc/fstab, with the following lines:

/swap                           none  swap  sw 0 0
nfsserver:/export/client/root   /     nfs   rw 0 0
nfsserver:/export/client/usr    /usr  nfs   rw 0 0
nfsserver:/export/client/home   /home nfs   rw 0 0

Edit /export/client/root/etc/rc.conf. Make sure the following are set:

hostname="client"
defaultroute="192.168.128.1"
nfs_client=YES
auto_ifconfig=NO
net_interfaces=""

Add the following lines to /export/client/root/etc/hosts:

192.168.1.10 client.test.net client
192.168.1.5  nfsserver.test.net nfsserver

Then:

# mv /export/client/root/usr/* /export/client/usr/ 

Nowadays, the Linux kernel has a built-in NFS server so no extra daemons are needed. You just need to make sure you have the kernel-server installed:

# apt install nfs-kernel-server

To make sure that your exported filesystems really are exported, you can force the NFS server to reread /etc/exports:

exportfs -r

Everything should now be in-place. so we’re ready to try booting the system. Plug an ethernet cable into the JavaStation, and at the ok prompt type “reset”. If all goes well, the NetBSD second stage bootloader should be fetched and executed.

If there are any problems, you can get a glimpse into what’s going on by sniffing the network traffic. Personally, I prefer to do captures with tcpdump and then analyse the dumps with Wireshark on my laptop: tcpdump is small and headless. For example running:

tcpdump -n -s0 -w boot.pcap host duke

This will create a capture file that will load straight into Wireshark or any other pcap compatible analyser. Here is what to expect.

Initially, you’ll see the RARP response as the Linux machine tells the Javastation its IP address. Next, you’ll see the JavaStation request the secondary bootloader with TFTP:

If the bootloader transfer succeeds, you’ll see a DHCP transaction followed by NFS traffic:

If all goes well, the first time you boot NetBSD you will be prompted to hit return:

At this point you are running an unconfigured version of NetBSD in single user mode. There are only two things left to do. Firstly, create all of the special device files in dev:

# mount /usr
# cd /dev
# /bin/sh MAKEDEV all

This takes a lot longer than you’d imagine – NFS over 10Mbps is slow…

Finally edit /etc/rc.conf and change the line that starts “rc_configured” to “rc_configured=yes”. N.B. Before you can run an editor like vi, you may need to set the terminal type to something generic:

# export TERM=vt100
# vi /etc/rc.conf

And finally, reboot the system:

# reboot

If the universe is behaving, the system will reboot and you’ll be rewarded with a login prompt. Login as root with no password, and you’re in business!

Obviously there is still a lot to do; as you can see postfix isn’t happy, and the swapfile security needs tightening up for a start. But we do now have a functional NetBSD system running on a vintage network computer!

Share

Good week, considering

Kimmel Center ceilingDespite having been quite miserable for the majority of the last few months, I thought it probably better to record something positive rather than try to let out a long, anguished, scream in blog form. Everyone already knows about the global march backwards through the Enlightenment and into a new era of Feudal-Fascism so, instead of talking about that, here is a list of good things that happened this week, for future me to relish when looking back on the cadaver scattered wasteland of 2025.

  • Quiet drink at Blondie’s and C turns up after spotting me through the window.
  • My cousin wrote a little song about Il Douche. To the tune of “Delta Dawn” by “Tanya Tucker”:
    Diaper Don Diaper Don What’s the nappy you have on?
    Could it be a life on burgers and french fries?
    And did we hear you say you would rule the world your way”Delta Dawn” by “Tanya Tucker”:
    With Elon Musk to help you spread your lies.
    When he was a boy his daddy called him Dopey Don
    The dumbest kid he’d ever set eyes upon
    But now he sits in the White House pretending he’s a king
    Expecting all the world to come and kiss his ring
    Diaper Don, Diaper Don you sure are smelling strong
    And the all pervasive pong is hard to bear
    Your presence in the White House makes it stink just like a shitehouse
    But one fine day you’ll be no longer there
  • The monthly tradition of going to the Oyster house, followed by a quiet drink at Spice Finch with C, some Pinot Grigio, and a free brownie from the lovely server.
  • MQIO lives! — I can’t explain this, but it was a work achievement.
  • Javastation Lives! — this is a personal project that will get its own blog post because I’m surprisingly excited.
  • At last, after wanting one for 48 years, I can now teleport off this planet.
    Me wearing my new Blake's 7 teleport bracelet
  • Severance! I mean…Severance!
  • Nice domestic cosiness with the flock – and it seems Pepper sometimes practices talking in secret.
  • A nice Happy Friday at Milkboy with J (also Ax with her new London tattoo and experience of Spittalfields market).
  • Been listening to some great music ranging from classic Jungle, Angel Olsen, Charlotte Gainsbourg, ambient stuff, Bob Vylan and Amy Taylor.
  • Wordle, and Globle, and Connections discussions.
  • Altoids arctic mints – peerless.
  • Posh lunches: Vernick fish and Dandelion.
  • New Come Dine and Apprentice (UK obv).
  • The Philadelphia Orchestra at Kimmel – amazing all round. Ravel and Holst.

Share


2023

It’s almost a year since I last posted. A great deal has happened since that last post, most notably the death of my father. Trying to put the experience into words is beyond me, which is probably why there has been no posts. There are four draft posts in the dashboard, but I couldn’t finish them. So, in a fit of new-year optimism, I’m trying to write things again. Keeping a long way away from personal stuff is this new blog about RISC-V, and this review for Lowes which was in response to an experience that really got on my tits.

On the plus-side of 2022, I managed to start working at a new job that is stimulating, enjoyable, and doesn’t involve dealing with odious-bastard clients. I have learned from experience that when working closely with other people, it’s healthy to be able to have a level of frankness that can iron over disagreements and promote harmony – even if it initially causes upset. Far worse is to let bad feeling brew under the covers and get infected with pent-up frustration; eventually someone will explode and, by then, the damage to the project and the relationships could already be done. Unfortunately, when one of your close work-mates is a representative of the client, you can’t have that level of frankness. So, I’m glad to be out of a couple of messy situations and back to a healthy environment. It’s quite disturbing to discover how tightly my mental health seems to be entwined with the details of my day job.

To kick off the new year, here is a list of media I’ve enjoyed recently:

Happy new year.

Share

Feb 22 Thonks

Recent events have been messy. The general thrust is that I’ve resigned from a rather awesome company to rejoin another company that feels like a strange kind of home. Some other thonks from this week:

  • When you walk a cute dog, people tend to be much nicer to you; it’s much easier to get a “good morning” from someone when they’re appreciating your mutt.
  • Getting out of the house every day, even just to help a dumb animal move its bowels so that you can pick it up, adds a surprising amount of positivity to the day.
  • In his book “Bullshit Jobs“, David Graeber describes work as a sort of involuntary S&M relationship with your boss; the difference being that there is no safeword beyond “I quit”. Over the years I’ve noticed that there is an addictive quality to this safeword: be warned.
  • The Cardiacs were one of the most extraordinary and wonderful bands that ever existed. RIP Tim.
  • Amazon parrots are extremely good companions, and seem to share a great sense of humour.
  • The cold is better than the heat, especially if you can snuggle up in a warm bed at night.
  • The Internet has proven that access to information doesn’t guarantee global enlightenment.
Share

Zoom Feature Request

The 40 minute cutoff for Zoom meetings should be the feature you pay for. The human concentration limit in a meeting/lecture scenario is around 40 minutes, so when you get booted out, it really is for everyone’s benefit. Another feature I’d like to see is a time limit based on how much of a twat you are. It could use AI to work, out on a scale, how irritating and worthless everyone is, and then boot them out one by one in order.

Share