Overview
How to use SSH to get where you need to be without all that tedious mucking about with choke-point boxes.
TL;DR guide to tunneling through a jump server (AKA choke-point server)
Assuming you want to login to servers in the address range 172.16/16 and you have to go via a jump server called jumpbox.example.com. This method should work equally well with Linux, BSD, OS-X, and Cygwin.
N.B. these are fake, example addresses used for illustrative purposes.
Configuration: you only need to do this once
- Make sure you can ssh into the jump server, preferably using a key (e.g. ~/.ssh/mykey).
- Create a tunnel script (e.g. /usr/local/bin/jump) consisting of:
ssh -i ~/.ssh/mykey USERNAME@jumpbox.example.com -D6969
or, if you want to run the command in the background and not keep a window open:
nohup ssh -i ~/.ssh/mykey USERNAME@jumpbox.example.com -D6969 -N >/dev/null 2>&1 & - Add the following to your ~/ssh/config file – modify details to taste:
Host 172.16.*

User ec2-user

ProxyCommand /usr/bin/nc -X 5 -x 127.0.0.1:6969 %h %p

IdentityFile ~/.ssh/mykey
Using your tunnel
- To turn on your magic tunnel, just run the script and keep it running in the background or in a minimized window e.g.:
jump - Once the tunnel is running you may then ssh into any of your hosts directly without any special arguments:
ssh 172.16.24.24
To use a web browser over the tunnel, go into your proxy settings and add a SOCKSv5 proxy on localhost:6969 (in this example). The effect will be as if you are plugged into the network at the other end of the tunnel.
To make it simple to switch between your normal browsing and browsing via the ssh connection, it’s advisable to install a browser plugin that makes switching between proxy servers simple or even automatic. SwitchySharp (Chrome) and FoxyProxy (Firefox) are good examples.
In depth – how SSH tunneling works
What is an SSH tunnel
SSH is regarded by most people as a way to “login” to remote machines and manage them; it was originally intended as an encrypted alternative to the veteran telnet protocol. However it is far more than that. It additionally provides a drop-in replacement for tools such as rsh, rcp and ftp but it’s a lot more than that too. The trick is that when you ssh to a remote machine you actually establish a connection between you and the machine that, unlike telnet, ftp and most other protocols, can be used for multiple purposes at the same time entirely transparently to the user; it looks like you have a single dedicated terminal session to the remote machine however ssh can magically send all kinds of traffic over the same connection without interfering with your session. Effectively, every ssh connection acts like a VPN between you and the remote machine.
The most common use for this feature of SSH is “port forwarding”; this allows a TCP port on your local machine to be magically connected to a TCP port at the other end of the connection even if it it’s normally unavailable to the outside world. For example, let’s say you have a server which runs an admin web service on localhost port 8080. Normally you wouldn’t be able to connect this service remotely because localhost is only available to the server itself. A common way people choose to fix this is by making the admin service available to the machines external IP address instead, but this is unwise. Firstly, you don’t want people to connect to the admin service, or even to know it exists. Secondly your corporate firewall only allows you to connect to this server on via SSH which is on TCP port 22. This is where port forwarding solves all problems in one go.
Local Port Forwarding
The following command:
ssh user@my.server.address -L1234:localhost:8080
Will allow you to login to the server as normal but in addition to your terminal session some magic has happened: port 1234 on your local machine is now connected to port 8080 on the remote machine. If you open a browser and go to http://localhost:1234/ you will actually be browsing the server on localhost:8080. This is referred to as Local Port Fowarding. The ‘-L’ on the command line performs this magic and it takes three arguments:
- The local port you want to forward
- The address of the remote server you want to forward it to
- The port you want to forward it to
 So in our example we are forwarding local port 1234 to localhost:8080 on the remote machine. It seems confusing that we specify ‘localhost’ as the remote server – why doesn’t it connect back to our local machine? The address you specify here is relative to the remote host – which is how we are able to connect ‘localhost’ on the remote machine – something that is impossible normally.
You may specify multiple -L parameters on the command line and thus forward multiple ports at the same time.
Things to note:
- No matter how many ports you forward, the only real network connection you are making is a single SSH connection to the remote machine on port 22. Any firewalls in between you and the remote machine will have no idea you are forwarding ports as all they will observe is a single connection.
- Everything you do over any of the forwarded ports is end-to-end encrypted with the remote server. Even if you are using a plaintext protocol (e.g. http), the data will be encrypted and not visible to eavesdroppers in transit.
- If you close your initial SSH connection, the forwarded ports will also close.
Dynamic port forwarding
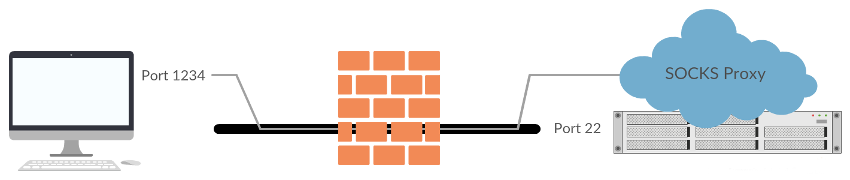
OpenSSH, one of the most popular SSH implementations, also has another trick up its sleeve. In addition to forwarding a local port to a remote port, you may forward a local port to its built in SOCKS proxy server. Any applications on your local machine which are SOCKS-aware (which includes most network applications, especially web browsers) will be able to transparently access the remote network as if they were plugged directly in. The ‘-D’ option performs the magic, and takes one argument: the local port you wish to use for the proxy server.
E.g. The command:
ssh user@my.server.address -D1234
will forward your local port 1234 to OpenSSH’s built-in proxy on the remote server. The upshot of this is that if you set your browser to use a SOCKS proxy on localhost:1234, you will be able to browse the remote network as if you were physically there.